
CI/CD - (1) EC2 초기 설정
처음에는 막막했지만, 한 번 해보고 나니 다음에는 더 빠르게 구축할 수 있을 것 같다.
크게 (1) EC2 세팅 / (2) 프로젝트 빌드를 위한 도커파일 작성 / (3) Jenkins를 이용해 Repository와 EC2 사이의 파이프라인 구축 을 해주면 된다!
EC2 초기 설정
0. 명령어
- EC2에 접속하기 : PEM키가 있는 위치에서
ssh -i <키 이름>.pem ubuntu@<서버 주소> - 실행 중인 프로세스 확인
- 전체 프로세스 확인 :
ps aux - 특정 단어를 포함하는 프로세스 확인 :
ps aux | grep [특정 단어] - 특정 PID로 실행되는 프로세스 확인 :
ps -p [PID]
- 전체 프로세스 확인 :
1. EC2 초기 설정
패키지 버전 업데이트
-
서버에 접속할 때마다 입력하여 인스턴스를 최신 상태로 유지
  sudo apt-get update // 인스턴스에 설치된 패키지 목록을 최신화
  sudo apt-get upgrade // 인스턴스에 설치된 패키지들을 최신 버전으로 업그레이드
🚨 Could not get lock /var/lib/dpkg/lock-frontend.
sudo apt-get upgrade실행 후 발생전체 에러 내용 :
E: Could not get lock /var/lib/dpkg/lock-frontend. It is held by process 19157 (unattended-upgr) N: Be aware that removing the lock file is not a solution and may break your system. E: Unable to acquire the dpkg frontend lock (/var/lib/dpkg/lock-frontend), is another process using it?
/var/lib/dpkg/lock: Debian 계열의 Linux 시스템에서 패키지 관리자인 dpkg가 동시에 여러 작업을 수행하지 못하도록 잠긴(lock) 파일- 해결방법
- 방법 1. lock 파일을 삭제
- 어떤 역할을 하는 파일인지 정확히 알지 못해서 삭제는 보류
- (해결) 방법 2. 해당 프로세스 종료 후 실행
- 실행 중인 프로세스 종료 :
sudo kill -9 19157sudo apt-get upgrade다시 실행
EC2 Time zone 설정
sudo timedatectl set-timezone Asia/Seoul
- 서버 TimeZone을 한국 표준시로 변경
- 현재 날짜, 시간, 시간대 정보 확인 :
date
방화벽 설정
💡 UFW(Uncomplicated Firewall)
- Ubuntu에서 기본으로 제공하는 방화벽 설정 도구
sudo apt install ufw // UFW 설치

sudo ufw default deny incoming // 모든 인바운드 연결 차단
sudo ufw default allow outgoing // 모든 아웃바운드 연결 허용
sudo ufw allow ssh // 22번 포트 허용
sudo ufw allow http // 80번 포트 허용
sudo ufw allow https // 443번 포트 허용

sudo ufw status // 설정한 규칙 확인
sudo ufw enable // 방화벽 활성화
- 방화벽으로 모든 포트를 막고, 필요한 세 개의 포트만 허용하도록 방화벽 규칙 설정
-
허용할 포트 : ssh(port 22), http(port 80), https(port 443)
💡 22번 포트(SSH)를 열지 않으면 서버에 접속할 수 없어서 꼭 열어야 함!
- SSH(Secure Shell) : 네트워크를 통해 안전하게 다른 컴퓨터나 서버에 접속하기 위한 프로토콜
- SSH 포트 열지 않고 방화벽 활성화하면 서버에 SSH 연결을 할 수 없음
-
특정 포트 비허용 :
sudo ufw delete allow [포트 번호]
-
- 설정한 규칙 확인
- 모든 규칙 :
sudo ufw status - 특정 포트만 확인 :
sudo ufw status | grep [포트번호]
- 모든 규칙 :
- 방화벽 활성화 :
sudo ufw enable- 비활성화 :
sudo ufw disable
- 비활성화 :
2. EC2에 필요한 프로그램 설치
- Nginx, Docker, Docker-Compose, Jenkins
Nginx 설치
-
nginx 설치
sudo apt-get update sudo apt-get upgrade sudo apt-get install nginx- nginx 삭제 :
sudo apt-get -y remove --purge nginx nginx-full nginx-common/etc/nginx까지 완벽하게 삭제해야 함
-
설치 완료 후 서버 url로 접속하면 나오는 화면

- nginx 삭제 :
-
필요한 경우 리버스 프록시 설정
Docker 설치
-
Docker 설치를 위해 필요한 패키지들을 설치
sudo apt-get -y install apt-transport-https ca-certificates curl gnupg-agent software-properties-commony: 이 명령어를 실행하면서 발생하는 모든 항목에 동의한다는 옵션apt-transport-https: HTTPS를 통해 소프트웨어를 다운로드 받기 위한 패키지ca-certificates: 인증된 SSL/TLS 인증서의 리스트를 관리하는 패키지curl: URL에서 데이터를 전송하는 데 사용되는 도구. 이를 이용해 특정 웹사이트에서 데이터를 내려 받을 수 있음gnupg-agent: GNU 프라이버시 가드의 일부로, 사용자 인증에 사용되는 키 관리와 관련된 작업을 수행-
software-properties-common: PPA를 추가할 때 사용💡 PPA(Personal Package Archive)
- 런치패드에서 제공하는 우분투의 공식 패키지 저장소에 없는 서드 파티 소프트웨어를 위한 개인용 소프트웨어 패키지 저장소
-
Docker에 대한 GPG Key 등록
curl -fsSL https://download.docker.com/linux/ubuntu/gpg | sudo apt-key add- 도커 패키지가 신뢰할 수 있는 출처에서 왔음을 시스템이 알 수 있음
💡 GPG Key
- GPG(GNU Privacy Guard) : 데이터 보안 및 개인 정보 보호를 위한 오픈 소스 암호화 및 서명 시스템
- GPG Key : 암호화 및 서명 작업을 수행하는 데 사용되는 암호화 키쌍
-
Docker repository 등록
sudo add-apt-repository "deb [arch=amd64] https://download.docker.com/linux/ubuntu $(lsb_release -cs) stable" -
Docker 설치
sudo apt-get update && sudo apt-get install docker-ce docker-ce-cli containerd.iodocker-ce: Docker Community Editiondocker-ce-cli: Docker Community Edition의 CLI 지원용 패키지containerd.io: 도커 컨테이너 런타임
💡 Docker에 일반 유저로 접속한 경우 sudo 로 명령어 실행
- Docker는 언제나 root 권한에서 실행되기 때문
-
Docker 정상 설치 되었는지 확인
docker -v -
필수 패키지 설치
sudo apt-get install -y \ ca-certificates \ curl \ gnupg \ lsb-release -
Docker 그룹에 사용자를 추가하고 Docker 서비스 재시작
sudo usermod -aG docker ubuntu // ubuntu : 사용자 이름 sudo service docker restart- ubuntu에 접속한 계정 확인 :
whoami
- ubuntu에 접속한 계정 확인 :
-
Docker 버전 확인
docker version -
Docker 활성화
  sudo systemctl enable docker // 시스템이 부팅될 때 Docker가 자동으로 시작되도록 설정
  sudo systemctl start docker // Docker를 현재 세션에서 즉시 시작

  sudo systemctl enable containerd // 시스템이 부팅될 때 containerd(컨테이너 런타임) 서비스가 자동으로 시작되도록 설정
  sudo systemctl start containerd // containerd 서비스를 현재 세션에서 즉시 시작
💡 현재 세션에서 즉시 시작 == 명령을 실행한 시점에 즉시 시작
Docker-Compose 설치
💡 Docker-Compose
- 멀티 컨테이너 도커 애플리케이션의 설정과 배포를 간소화 할 수 있는 도구
- YAML 스크립트를 기반으로 동작함
-
필요한 패키지 설치
sudo apt install jqjq: JSON을 커맨드 라인에서 처리하는데 사용되는 도구
-
Docker-Compose 버전 정보를 환경 변수에 저장
DCVERSION=$(curl --silent https://api.github.com/repos/docker/compose/releases/latest | jq .name -r)- Docker-Compose의 최신 버전을 설치하기 위해서 Docker -Compose의 버전 정보를 찾아야 함
- 이를 환경 변수에 이를 저장하여 사용
-
Docker-Compose의 목표 경로 지정
DCDESTINATION=/usr/bin/docker-compose -
Docker-Compose 의 최신 버전 바이너리를 다운로드 받고, 이를 목표 경로에 저장
sudo curl -L https://github.com/docker/compose/releases/download/${DCVERSION}/docker-compose-$(uname -s)-$(uname -m) -o $DCDESTINATION -
바이너리 파일에 모든 사용자가 사용할 수 있도록 실행 권한을 부여
sudo chmod 755 $DCDESTINATION💡 권한 설정
- 각 자리의 의미
- 첫 번째 숫자 : 소유자(Owner)에 대한 권한
- 두 번째 숫자 : 그룹(Group)에 대한 권한
- 세 번째 숫자 : 다른 사용자(Other)에 대한 권한
- 각 숫자의 의미
- 4 : 읽기 권한 (Read)
- 2 : 쓰기 권한 (Write)
- 1 : 실행 권한 (Execute)
ex. 7 = 4 + 2 + 1 : 읽기, 쓰기, 실행
5 = 4 + 1 : 읽기, 실행
- 디렉토리에 권한을 설정하는 경우 해당 디렉토리 내의 파일과 서브디렉토리에 대한 권한도 설정됨
- 각 자리의 의미
-
정상적으로 설치가 되었는지 확인
docker-compose -v
Jenkins 설치
💡 Jenkins
- 오픈 소스 자동화 서버로, 프로젝트를 더 효율적으로 관리할 수 있게 도와주는 도구
- 이를 통해 개발자들은 소프트웨어 개발에서 CI(지속적 통합)과 CD(지속적 배포)를 가능
-
스왑 메모리 선언
💡 스왑(Swap) 메모리
- Linux와 Unix 기반 시스템에서 컴퓨터의 물리적인 RAM이 부족한 경우를 대비하여 디스크 공간을 일시적으로 추가 메모리로 사용하는 가상 메모리의 일부
- 메모리가 부족한 상황에서 스왑이 사용되면 운영 체제는 RAM에서 사용하지 않는 데이터나 프로세스를 스왑 영역으로 옮겨서 공간을 확보하여 물리적인 RAM의 한계를 넘어서 더 많은 데이터를 처리
- 스왑은 물리적인 RAM에 비해 훨씬 느리기 때문에, 스왑을 사용하는 것은 성능에 부정적인 영향을 미칠 수 있음
- Jenkins를 제대로 활용하기 위해서는 많은 메모리가 필요 메모리에 대한 적절한 관리 필요
- 빌드를 여러번 진행할수록 더 많은 메모리를 사용
- Ubuntu에 하드디스크를 활용해 가상 메모리를 설정
df -h # 용량 할당 sudo fallocate -l 8G /swapfile # Swap 영역 할당 (일반적으로 서버 메모리의 2배) sudo chmod 600 /swapfile # Swapfile 권한 수정 sudo mkswap /swapfile # Swapfile 생성 sudo swapon /swapfile # Swapfile 활성화 free -h # swap 영역이 할당 되었는지 확인 -
Jenkins 이미지 받아오기
sudo docker pull jenkins/jenkins:lts -
Jenkins 컨테이너 이미지 실행
  sudo docker run -d \
  	--env JENKINS_OPTS=--httpPort=9090 \ # 9090 포트로 배포
  	--env JAVA_OPTS=-Xmx2g \ # Jenkins의 메모리 제한을 2GB로 설정
  	-v /etc/localtime:/etc/localtime:ro \
  	-e TZ=Asia/Seoul \
  	-p 9090:9090 \ # 9090:9090 포트로 배포
  	-v /jenkins:/var/jenkins_home \ # Jenkins가 종료되었을 때 모든 설정이 사라지지 않도록 볼륨을 마운트
  	-v /var/run/docker.sock:/var/run/docker.sock \
  	-v /usr/bin/docker-compose:/usr/bin/docker-compose \
  	--name jenkins \
  	-u root \
  	jenkins/jenkins:lts
-v /var/run/docker.sock:/var/run/docker.sock: docker.sock 은 docker 서비스와 통신하기 위한 주요 경로
💡 docker.sock
- 로컬 머신에서 Docker CLI와 Docker 데몬 간에 통신하는 데 사용되는 UNIX 소켓 파일
Jenkins 초기 설정
- nginx 설정
-
Jenkins를 배포한 포트가 방화벽으로 막혀있어서 Jenkins에 접근할 수 없음
→ nginx 설정을 해줘야 접근 가능 (다른 서버 url로 접근하도록 하려면 dns 설정도 진행)
- Jenkins nginx 설정 가져오기 : https://www.jenkins.io/doc/book/system-administration/reverse-proxy-configuration-with-jenkins/reverse-proxy-configuration-nginx/
-
/etc/nginx/conf.d/jenkins.conf를 생성해 아래의 코드 입력upstream jenkins { keepalive 32; # keepalive connections server 127.0.0.1:9090; # jenkins ip and port } # Required for Jenkins websocket agents map $http_upgrade $connection_upgrade { default upgrade; '' close; } server { listen 80; # Listen on port 80 for IPv4 requests server_name http://jenkins.example.com/; # replace 'jenkins.example.com' with your server domain name # this is the jenkins web root directory # (mentioned in the output of "systemctl cat jenkins") root /var/run/jenkins/war/; access_log /var/log/nginx/jenkins.access.log; error_log /var/log/nginx/jenkins.error.log; # pass through headers from Jenkins that Nginx considers invalid ignore_invalid_headers off; location ~ "^/static/[0-9a-fA-F]{8}\/(.*)$" { # rewrite all static files into requests to the root # E.g /static/12345678/css/something.css will become /css/something.css rewrite "^/static/[0-9a-fA-F]{8}\/(.*)" /$1 last; } location /userContent { # have nginx handle all the static requests to userContent folder # note : This is the $JENKINS_HOME dir root /var/lib/jenkins/; if (!-f $request_filename){ # this file does not exist, might be a directory or a /**view** url rewrite (.*) /$1 last; break; } sendfile on; } location / { sendfile off; proxy_pass http://jenkins; proxy_redirect default; proxy_http_version 1.1; # Required for Jenkins websocket agents proxy_set_header Connection $connection_upgrade; proxy_set_header Upgrade $http_upgrade; proxy_set_header Host $http_host; proxy_set_header X-Real-IP $remote_addr; proxy_set_header X-Forwarded-For $proxy_add_x_forwarded_for; proxy_set_header X-Forwarded-Proto $scheme; proxy_max_temp_file_size 0; #this is the maximum upload size client_max_body_size 10m; client_body_buffer_size 128k; proxy_connect_timeout 90; proxy_send_timeout 90; proxy_read_timeout 90; proxy_request_buffering off; # Required for HTTP CLI commands proxy_set_header Connection ""; # Clear for keepalive } } -
설정한 경로(
http://jenkins.example.com/)로 들어가면 Jenkins에 접속할 수 있음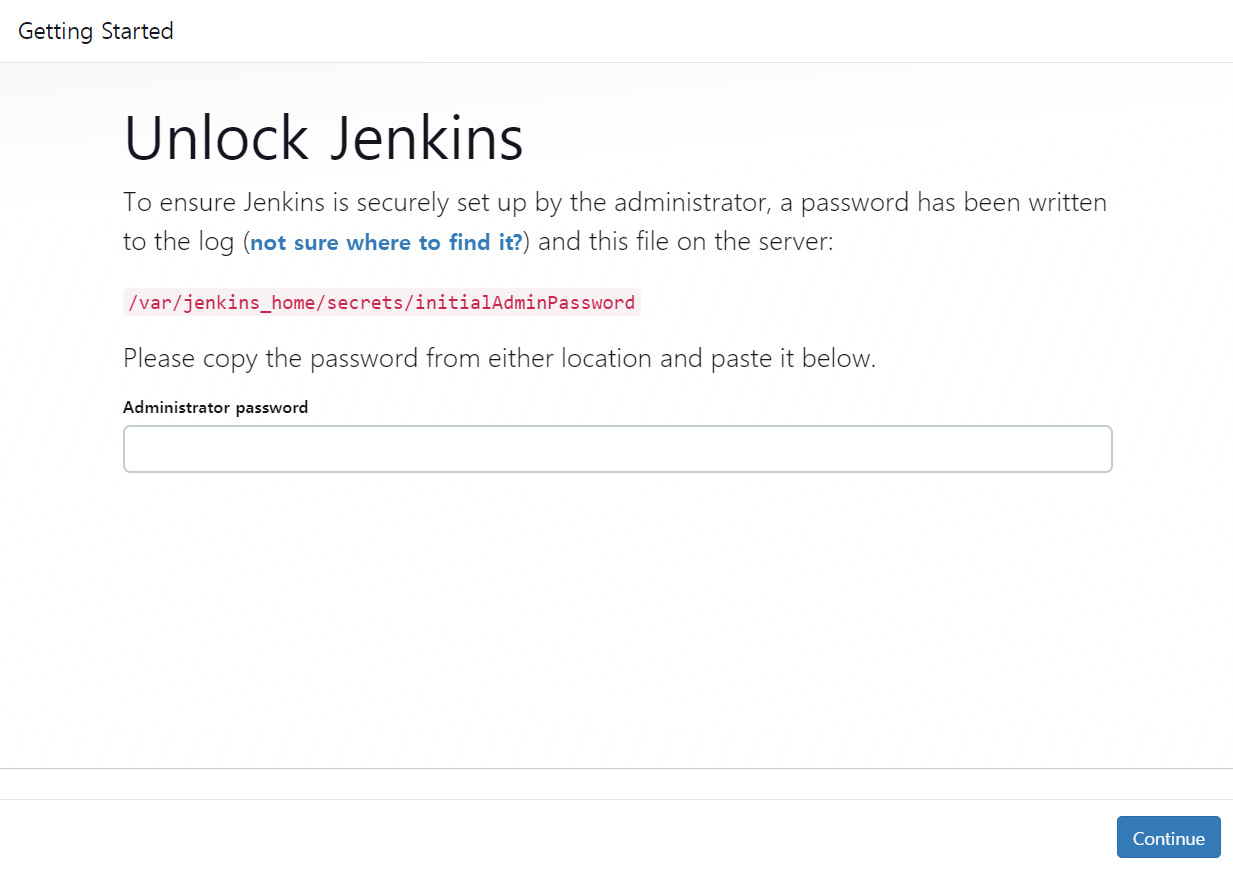
- 인증키 확인 :
sudo docker exec jenkins cat /var/jenkins_home/secrets/initialAdminPassword
- 인증키 확인 :
-
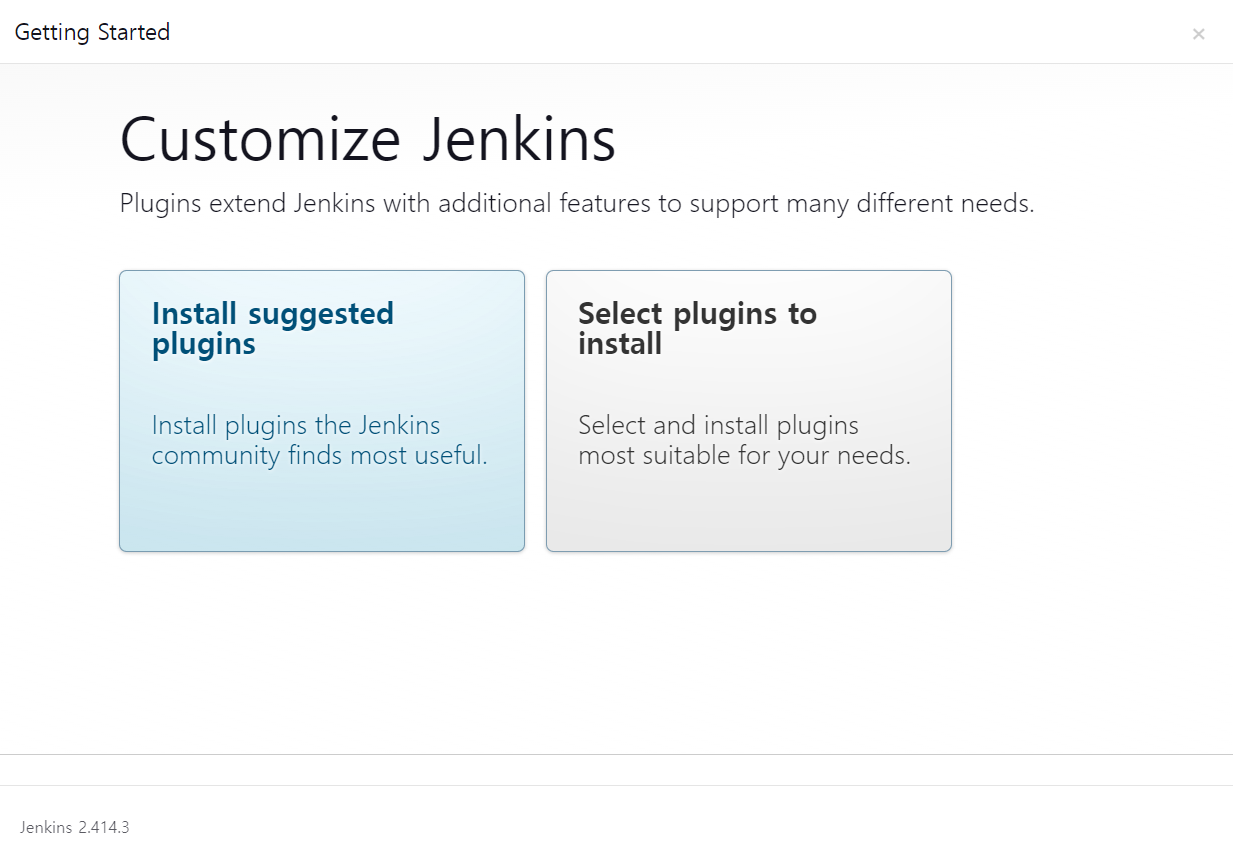
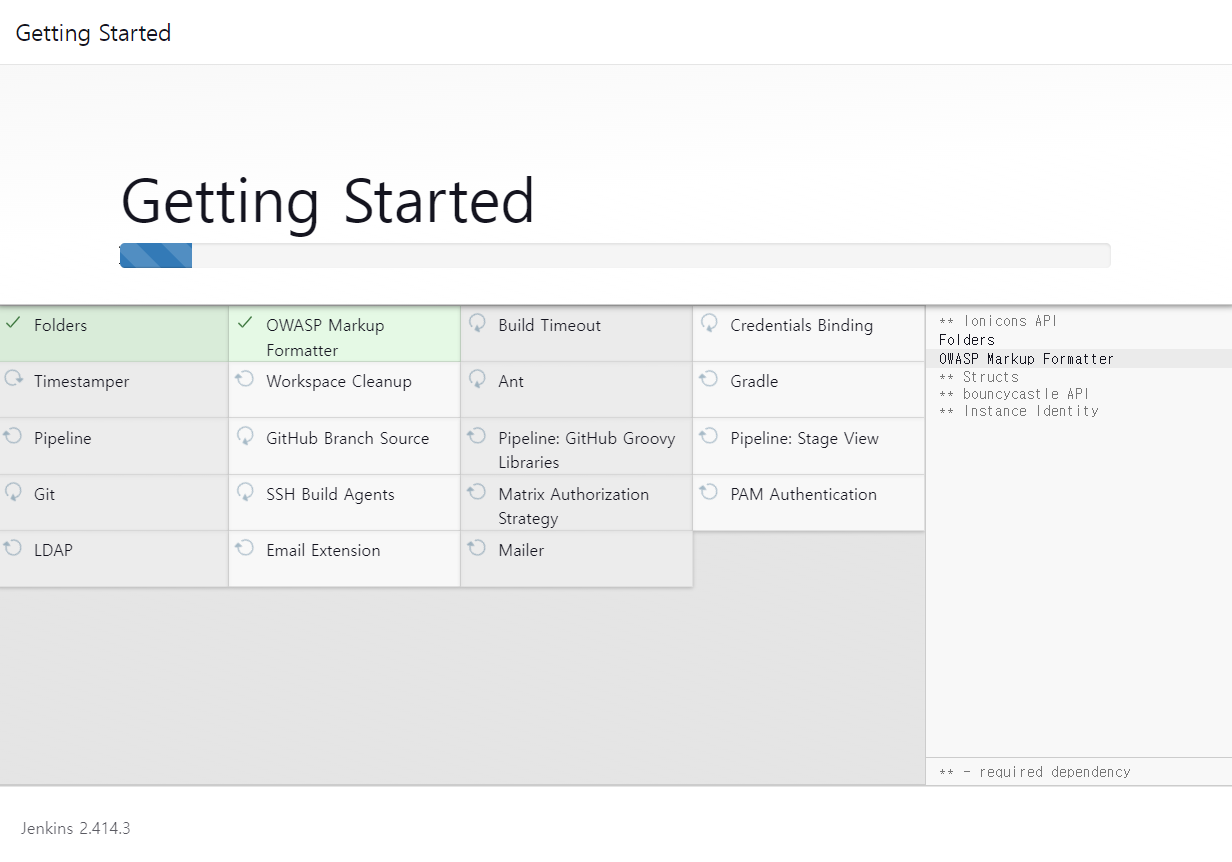
- Jenkins 초기 설정
- install suggested plugins를 선택해 플러그인을 설치
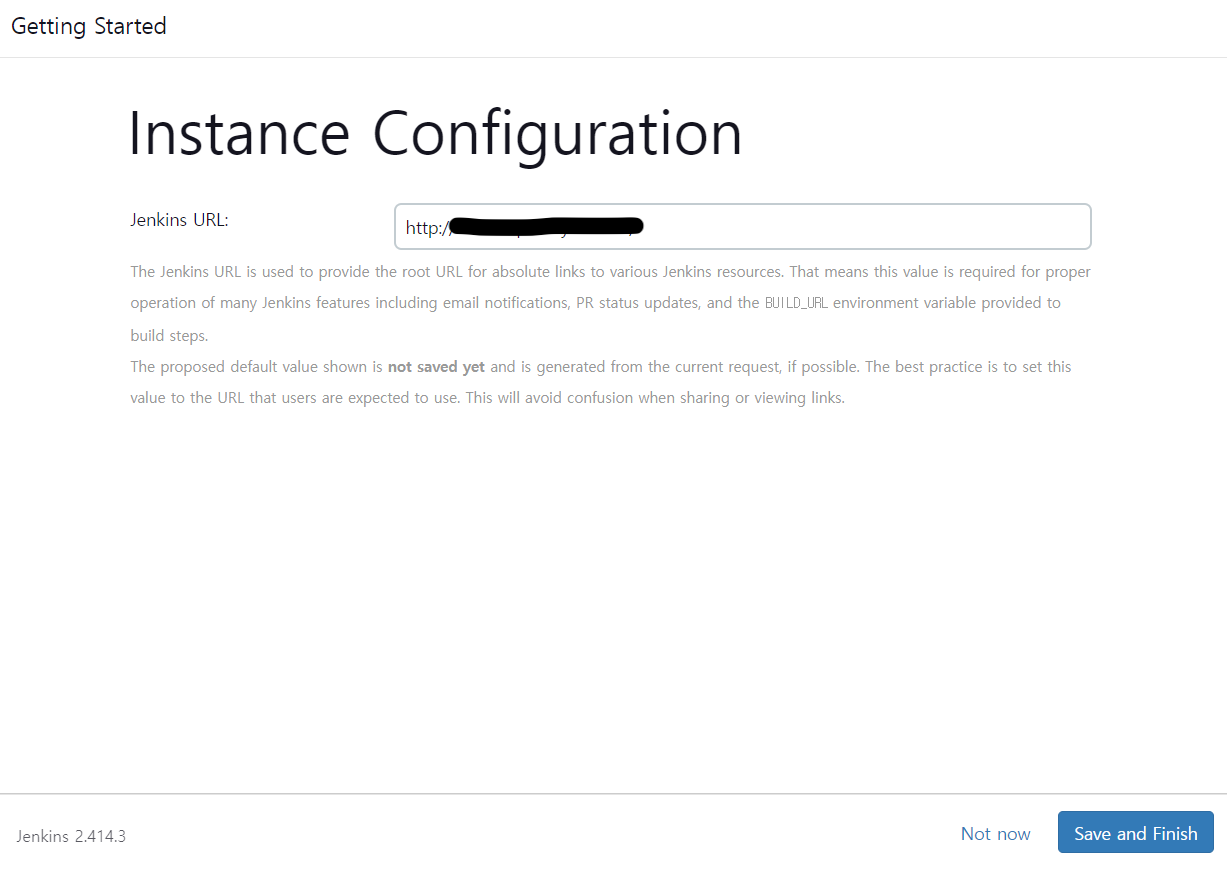
- 계정 생성 및 jenkins url 확인
- 플러그인 설치
- Jenkins 관리 > Plugins > Available plungins에서 플러그인 검색 후 설치
- 설치해야 하는 플러그인
- SSH Agent
- Docker
- Docker Commons
- Docker Pipeline
- Docker API
- Generic Webhook Trigger
- GitLab
- GitLab API
- GitLab Authentication
Leave a comment